![]()
How to Use Juicer Attachments on Mixers and Food Processors
Get More from Your Mixer: Use Juicer Attachments Safely
Save time and avoid mess: learn to attach, operate, and care for juicer attachments on mixers and food processors — one attachment can juice a dozen apples in minutes, seriously.
What You’ll Need
Must-Have
KitchenAid Stand Mixer Citrus Juicer Attachment
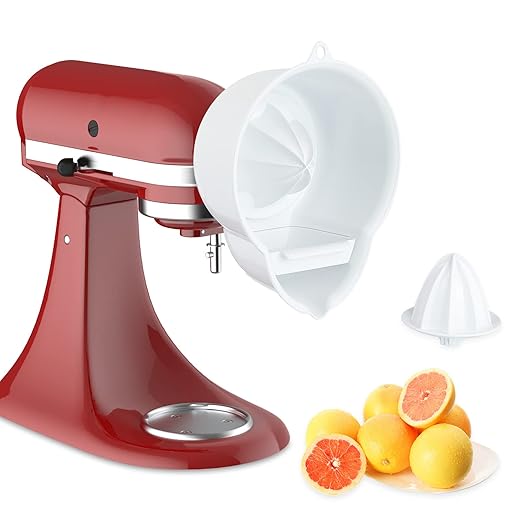
Fits all KitchenAid mixers; two reamers
Attaches to the power hub of KitchenAid (and some Cuisinart) stand mixers to quickly juice citrus using two reamer sizes. Includes a strainer basket, deep housing to reduce splashing, and is dishwasher-safe for easy cleanup.
I may earn a commission at no cost to you.
1
Check Compatibility and Safety First
Don’t guess—fit and power matter. Why matching models can save your motor.Confirm the juicer attachment is designed for your exact mixer or food processor model.
Consult the manufacturer manual or website for compatibility charts and recommended run times.
Inspect the coupling and lock mechanisms for wear and proper alignment so the attachment sits securely.
Verify the motor’s power rating and heed any warnings about continuous use.
Check that safety interlocks, lids, feed chutes, and guards engage before enabling power.
Avoid using the wrong attachment or ignoring limits, which can overstress the motor or create dangerous wobble.
Editor's Choice

Cuisinart Core Elements 2-in-1 Juicing Center
Converts between extractor and citrus juicer
An accessory for Cuisinart Core Custom food processors that switches from a juice extractor to a citrus reamer for versatile juicing of fruits and vegetables. Features a drip-proof spout and mesh-filter basket; motor base is not included.
I may earn a commission at no cost to you.
2
Assemble the Juicer Attachment Correctly
A loose screen is like sifting soup—pointless. Here’s how to avoid assembly mistakes.Wash and dry all parts before first use.
Align the attachment’s drive fitting with the mixer’s coupling, ensuring any keyed tabs match slots.
Fit the juicing cone or screw, blade or filter basket, and secure the locking ring or lid per instructions.
Confirm seals, gaskets, and strainers are seated so pulp and juice separate correctly.
Use the supplied tightening tool if included and hand-tighten only where recommended.
Rotate the attachment by hand to confirm smooth movement and no contact points before powering the machine.
3
Prepare Produce and Feed Properly
Whole fruits? Small chunks? Learn what saves time and prevents clogs.Trim and wash produce thoroughly. Remove large pits, cores, and thick stems before juicing.
Cut hard items. Cut carrots, beets, and apples to feed‑chute size so the auger can grip evenly — for example, 1–2 inch pieces. Halve soft fruits like peaches or kiwis.
Remove fibrous bits. Remove large seeds, celery strings, and pineapple cores that can tangle or clog attachments.
4
Operate the Mixer or Processor Safely
You can juice faster—if you don’t overwork the motor. Smart operation tips inside.Start on a low speed if your machine offers variable settings; increase only if the manufacturer recommends. For example, begin at “Low” for berries and move to medium for hard apples.
Use pulse mode to clear clogs or control pulp flow — pulse in short bursts (1–2 seconds) to dislodge jams or meter dense carrots.
Monitor motor temperature and allow cool‑down periods after prolonged use, because many home motors aren’t made for continuous heavy juicing.
Keep hands clear of the feed chute and always use the pusher. Stop and check assembly when vibration or unusual noise occurs.
5
Clean and Maintain Attachments for Longevity
A quick rinse now prevents replacements later—small chores, big savings.Disassemble immediately after use to prevent pulp drying on screens and blades.
Ready to Juice Responsibly
Follow compatibility checks, assemble correctly, feed smartly, operate safely, and clean routinely to maximize results and lifespan. Try it, share your juicing successes, and inspire others to start today now.
This post contains affiliate links. Purchases may earn me a commission at no extra cost to you.